¶ 🛒 Processing a Sale in AKAS POS Mart
This section explains how to find products, add them to a sale, and view the current transaction in the Mart (Retail) Mode of the AKAS POS system.
Note: you need to Login
¶ 1. Screen Layout Overview (Mart Mode)
The main screen is divided into three primary sections:
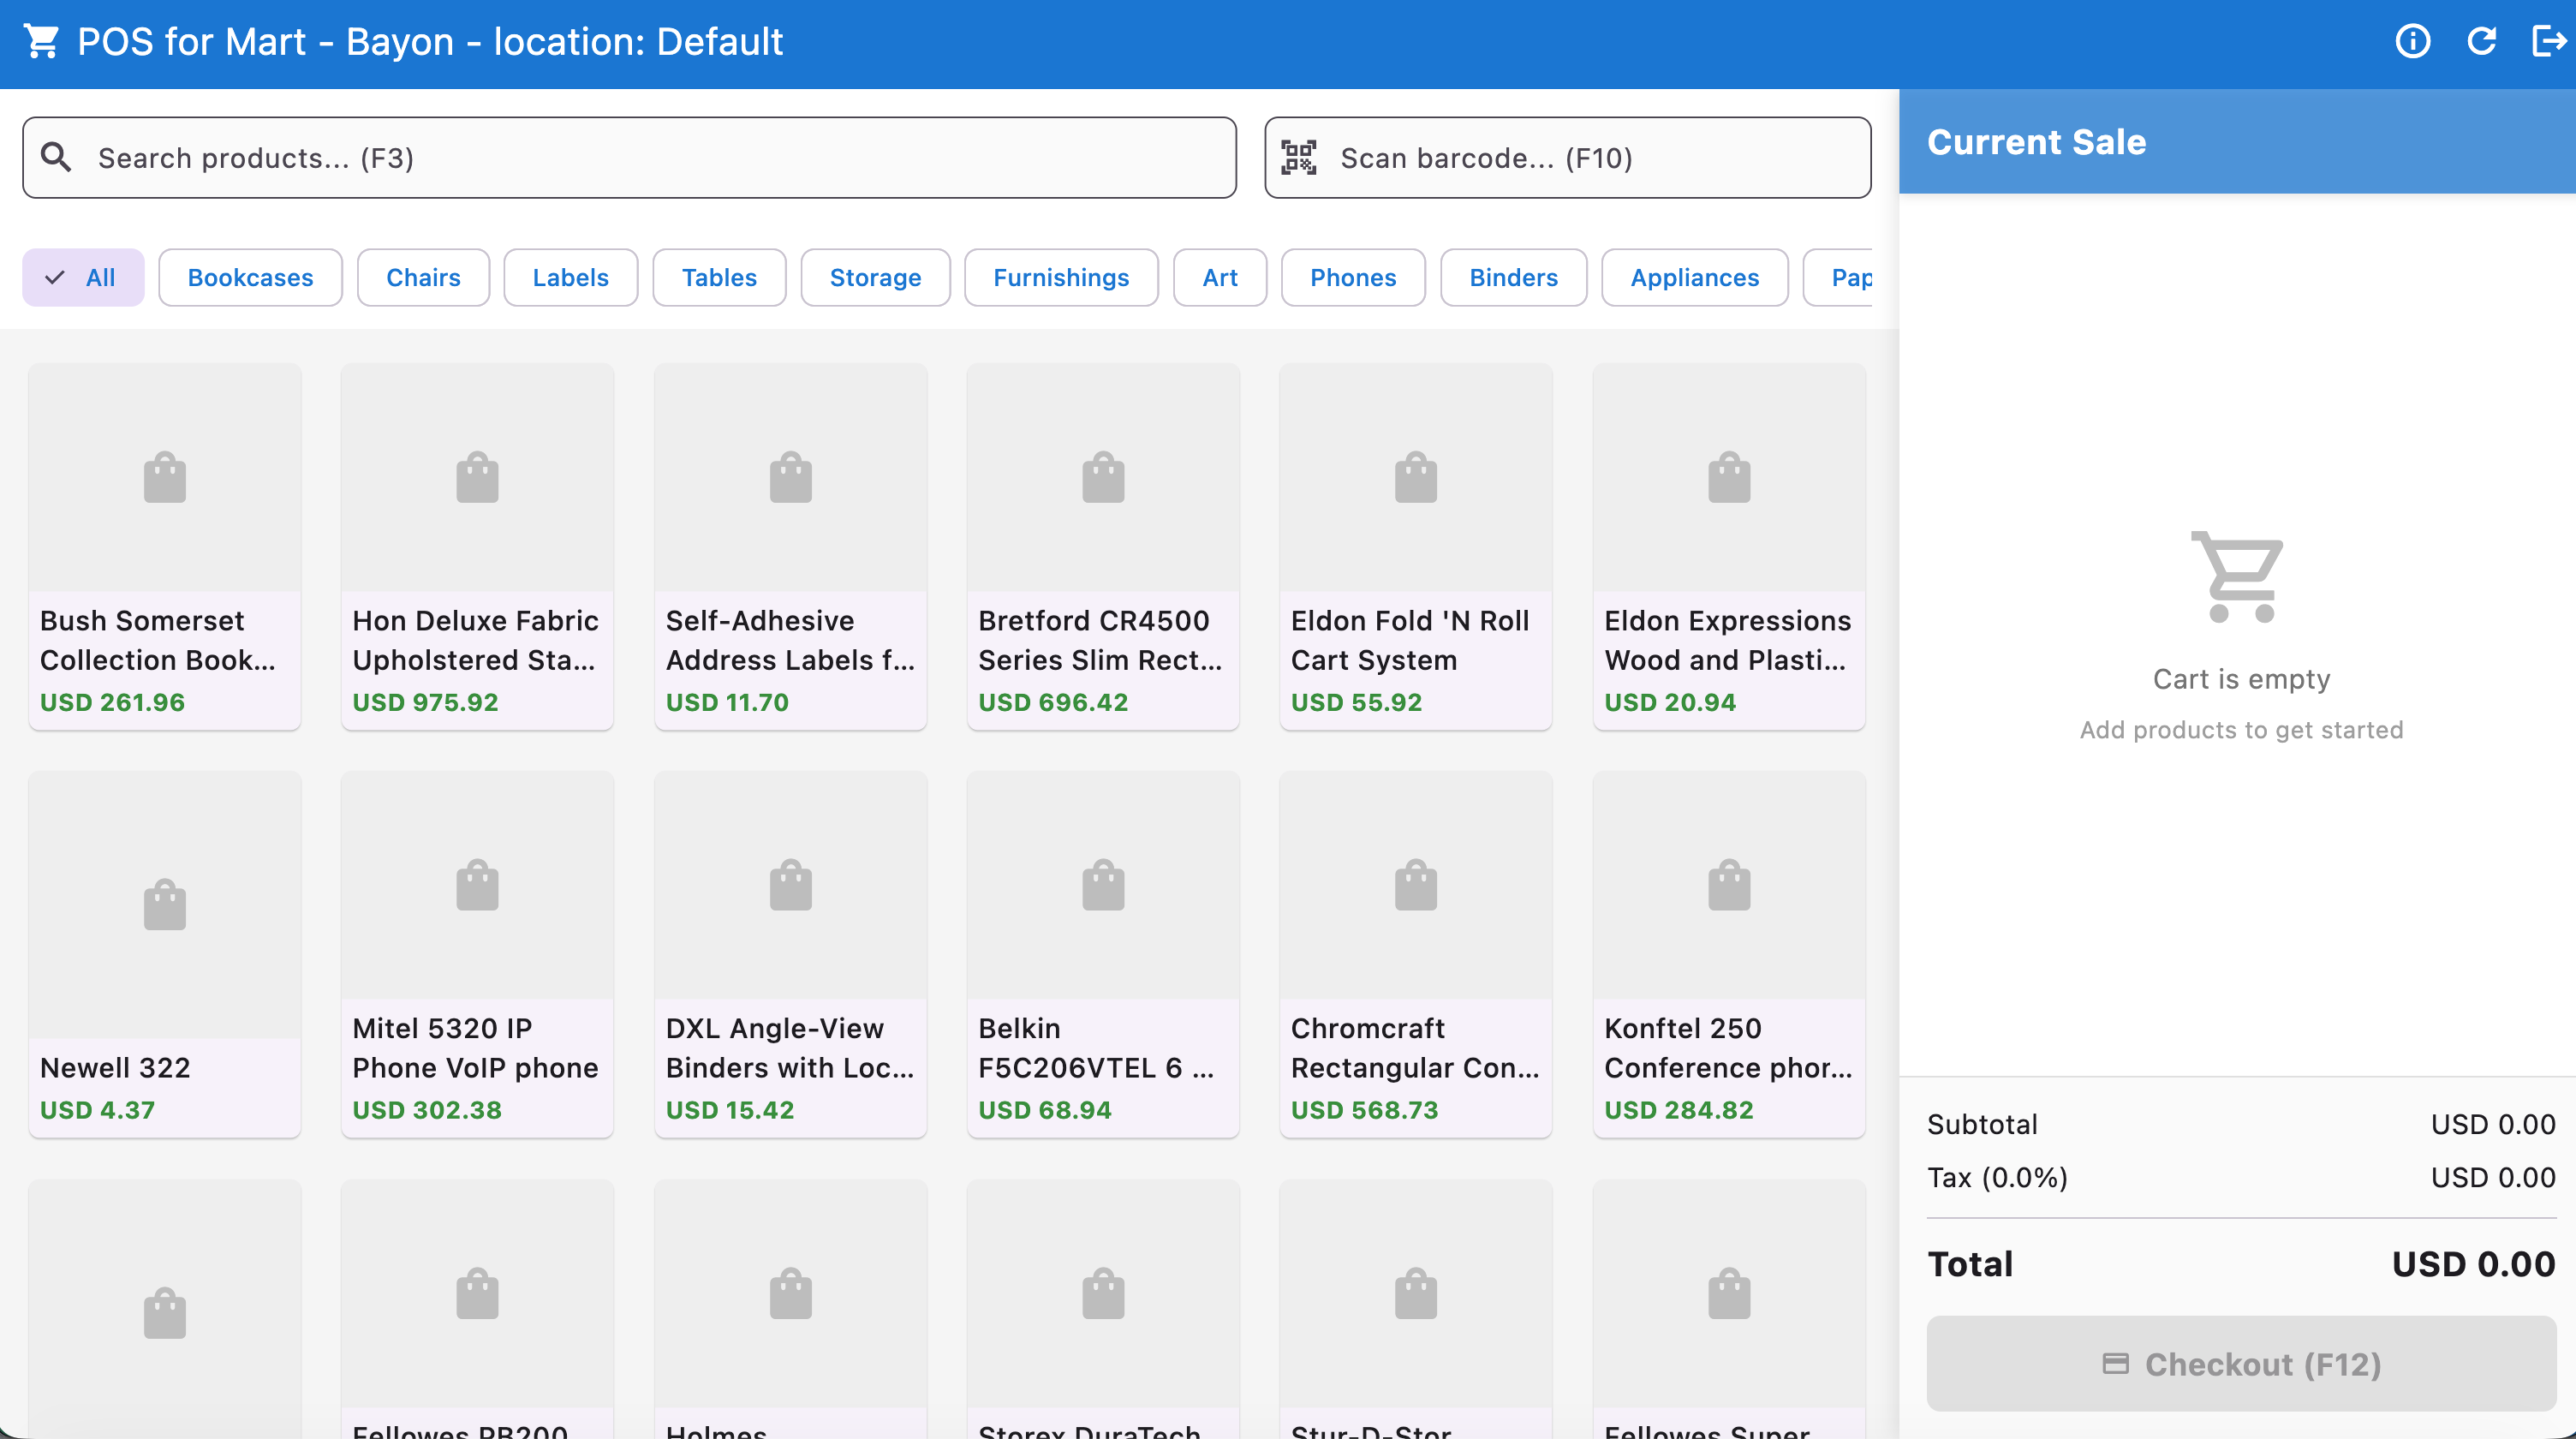
| Section | Function | Key Components |
|---|---|---|
| A. Header/Search Bar | System commands and product lookup. | Search field, Scan Barcode field, Refresh/History/Settings icons. |
| B. Product Catalog | Display and selection of items for sale. | Category filters (All, Bookcases, Chairs, etc.), Product Tiles. |
| C. Current Sale Panel | Tracking the items and totals for the current transaction. | Item list (currently "Cart is empty"), Subtotal, Tax, Total, Checkout (F12) button. |
¶ 2. Adding Products to the Sale
There are two primary ways to add products to the "Current Sale" cart:
¶ 🔍 Method 1: Searching and Manual Selection
Search: Click or tap the Search products... (F3) field.
Type the product name or SKU (Stock Keeping Unit) to filter the catalog.
Filter by Category: If you prefer to browse, click on the Category Tags (e.g., "Bookcases," "Chairs," "Labels") located just below the search bar to narrow the product display.
Add Item: Once you locate the desired item on the screen (e.g., "Bush Somerset Collection Book..."), simply click or tap the product tile. The item will instantly be added to the Current Sale panel on the right.
¶ Barcode Method 2: Scanning (Fastest Method)
Ensure your barcode scanner is connected and working.
Place the item's barcode in front of the scanner.
The scanned item will appear in the Scan barcode... (F10) field momentarily, and then the product will be automatically added to the Current Sale panel.
Tip: Pressing F10 on the keyboard can quickly activate the scan field if it loses focus.
¶ 3. Reviewing the Current Sale
The panel on the right side of the screen, labeled Current Sale, provides a real-time summary of the transaction.
Item List: As you add items, they will be listed here, showing the item name, quantity, and individual price.
Subtotal: The combined price of all products before tax. (e.g., USD 0.00)
Tax (0.0%): The amount of sales tax applied to the subtotal. (e.g., USD 0.00)
Total: The final amount the customer owes. (e.g., USD 0.00)
¶ 4. Completing the Transaction
Once all items have been added to the cart, you are ready to check out:
Verify the Total with the customer.
Click the large Checkout (F12) button at the bottom of the Current Sale panel.
This action will take you to the Payment Screen (not pictured), where you will enter the payment method (cash, card, etc.) and complete the sale.
¶ Checkout and Payment
This section details the steps to review the final transaction, apply discounts, and complete the payment once you have clicked the Checkout (F12) button on the main sales screen.
¶ 1. Checkout Screen Overview
The Checkout screen is a dedicated window that appears after initiating the payment process.

| Section | Purpose | Key Components |
|---|---|---|
| Items List | Final review of products and quantities. | Item Name, Quantity (e.g., 1x), and line item price (e.g., USD 20.94). |
| Discount Coupon | Field to apply promotional codes. | Text field to enter the code and an Apply button. |
| Transaction Summary | Final calculation of amounts. | Subtotal, Tax, and the definitive Total amount. |
| Action Buttons | Controls for finalizing or cancelling the transaction. | Cancel and Complete Payment (F12) button. |
¶ 2. Reviewing the Order
Before proceeding, confirm the order details with the customer:
Verify Items: Quickly review the Items list to ensure all products and their quantities are correct.
Example Items: 1x Eldon Expressions Wood..., 1x Chromcraft Rectangular..., 1x Bretford CR4500 Series...
Confirm Total: Check the final Total amount (e.g., USD 1,286.09) displayed in large text at the bottom.
¶ 3. Applying a Discount Coupon
If the customer provides a promotional code, follow these steps:
Enter Code: Click or tap the field labeled "Enter coupon code" under the Discount Coupon section.
Apply: Type the coupon code accurately and click the Apply button next to the field.
Verify Adjustment: The system will process the code. The Subtotal, Tax, and Total fields will automatically update to reflect the discount.
¶ 4. Finalizing the Payment
Once the order is verified and any applicable discounts are applied, and customer is paid, Click the Complete Payment (F12) - USD X,XXX.XX button to finalize this sale.
To Cancel: If the customer changes their mind about the purchase, click the Cancel button on the bottom left. This will dismiss the Checkout window and return the transaction to the "Current Sale" panel on the main screen, allowing you to modify the cart or clear the sale.
After clicking Complete Payment and processing the payment method on the subsequent screen, the Order Completed confirmation window will appear.
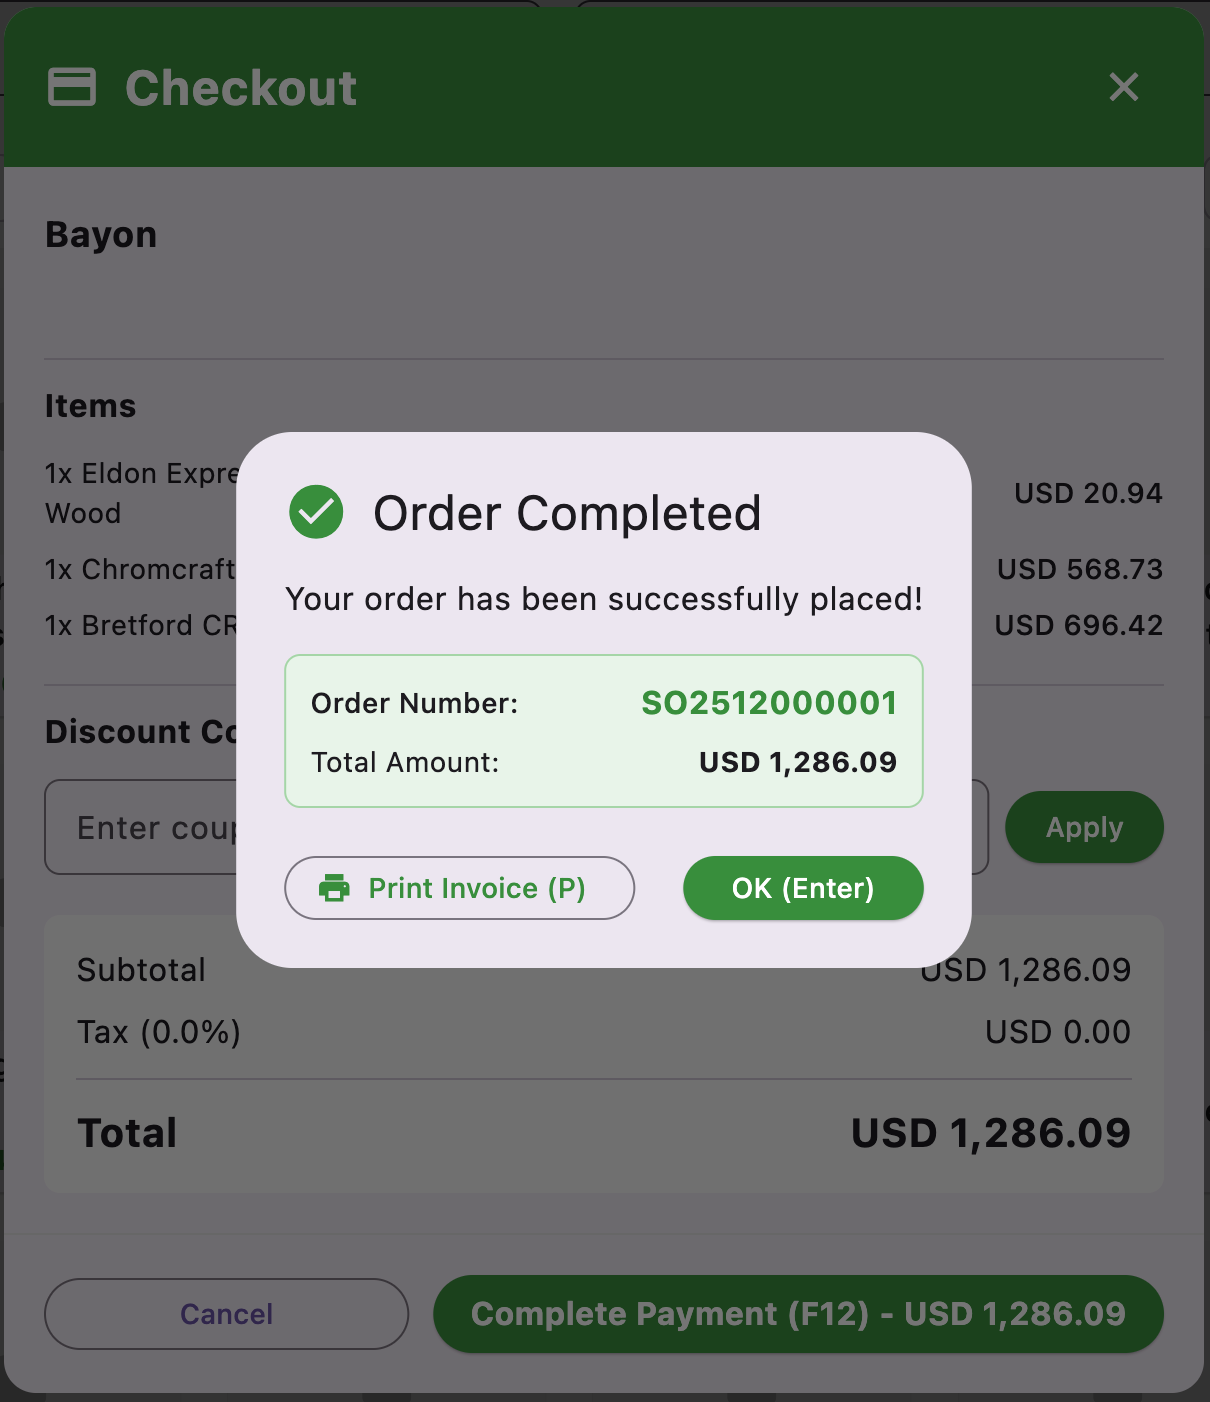
¶ A. Order Completed Confirmation
This pop-up window confirms that the transaction is successful and provides key details:
Confirmation Message: "Your order has been successfully placed!"
Order Number: A unique identifier for the transaction (e.g., SO2512000001). This number should be referenced for any future inquiries, returns, or exchanges related to this sale.
Total Amount: The final amount paid by the customer (USD 1,286.09).
¶ B. Final Actions
The cashier has two options to finalize the process:
Print Invoice (P):
Click the Print Invoice (P) button to send the transaction receipt to the connected printer.
Note: Pressing the letter P on your keyboard will also trigger this function.
Always provide the printed invoice/receipt to the customer.
OK (Enter):
Click the OK (Enter) button to dismiss the confirmation window.
Note: Pressing the Enter key on your keyboard is a quick way to perform this action.
This action returns the POS system to the main sales screen with an empty Current Sale cart, ready for the next customer.
Important: It is recommended to Print Invoice first, and then click OK (Enter) to ensure the customer receives their proof of purchase before starting a new transaction.