
Form Layout & Custom Fields
Administrators can change how forms look, add tenant-specific data fields, and control which columns appear on list screens. These tools apply across modules (Leave, Employees, Sales Orders, and others) wherever a form or list supports customization.
Permissions
Section titled “ Permissions”| Permission | What it unlocks |
|---|---|
formlayout.update |
Design Mode on forms, restore default layout, and Column Settings on lists |
customfield.update |
Create Data Field / edit / delete custom field definitions |
Users without formlayout.update do not see Design Mode or Column Settings. Assign these scopes on the user’s role under Permissions.
Customize form layout
Section titled “ Customize form layout”Open any create/edit form that supports layout customization (example below: Leave → Records → + Create).
- In the form dialog header, click the ⋮ (vertical dots) menu.
- Choose Design Mode.
- The title shows (Design Mode). Layout changes auto-save after you move or edit fields.
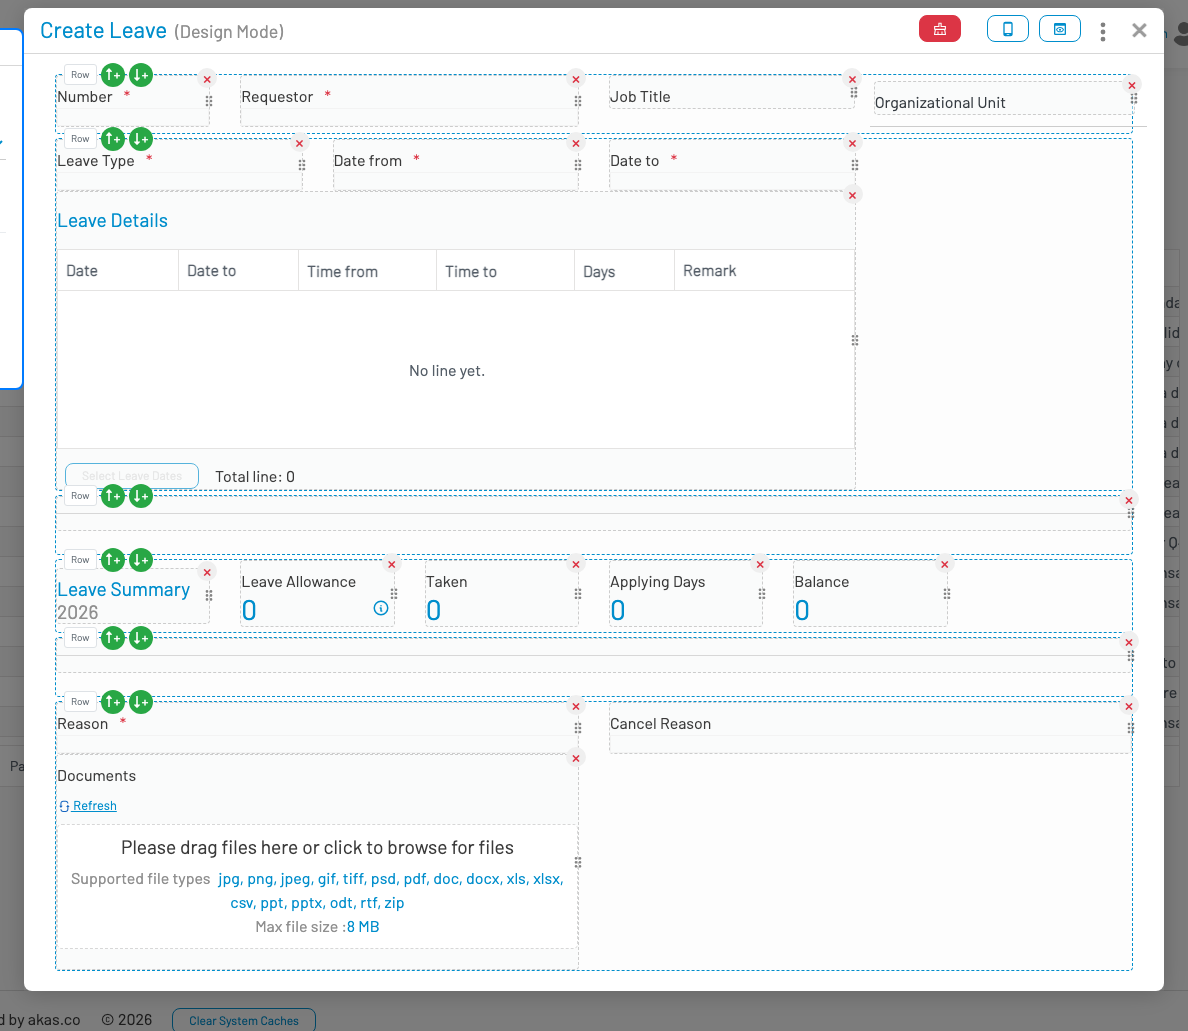
Design Mode tools
Section titled “ Design Mode tools”| Control | Action |
|---|---|
| Drag handle (six dots) on a field | Drag the field to another place in the same row or another row |
| Red × on a field | Remove the field from the layout (it moves to Available fields / Data fields so you can put it back) |
| Green ↑ / ↓ on a row | Move the whole row up or down |
| Red × on a row | Delete an empty or unwanted row |
| Clear / restore icon (header) | Restore form layout to original (removes saved customization for this form) |
| Phone icon | Mobile preview — check how fields wrap on a narrow screen |
| Eye / preview icon | Exit Design Mode and return to normal data entry (Run mode) |
A floating Available fields panel lists:
- Preset controls you can drag onto the form (when provided for that form)
- Data fields — removed built-in fields and custom fields not yet placed
Drag a field from that panel onto a row to put it back on the form.
Edit field label / help / required
Section titled “ Edit field label / help / required”In Design Mode, open a field’s settings (where available) to change:
- Label (and optional translation)
- Help text
- Required
Use Restore Default on that dialog to undo property overrides for that field.
Exit Design Mode
Section titled “ Exit Design Mode”Click the preview / run-mode control in the header, or open ⋮ and turn Design Mode off. Your layout is already saved; close the form when finished.
Create custom fields
Section titled “ Create custom fields”Custom fields store extra data on an entity (for example Leave, Employee, Item). You create them from Design Mode.
- Enter Design Mode on the target form (see above).
- In the Available fields panel, click Create Data Field.
- Fill in the definition, then click Create.
- Drag the new field from Data fields onto the form layout.
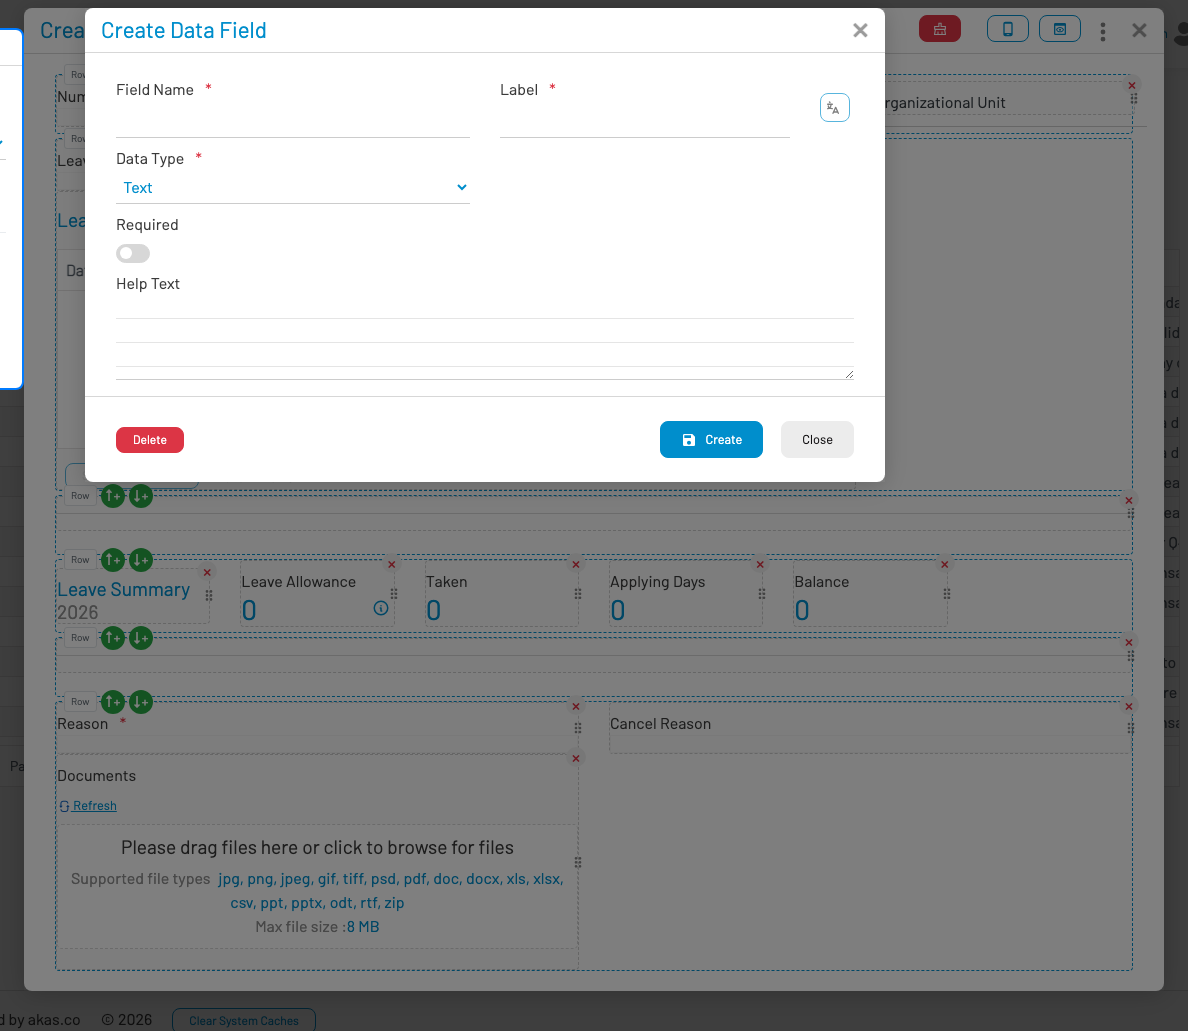
Custom field properties
Section titled “ Custom field properties”| Field | Description |
|---|---|
| Field Name | Internal key (no spaces). Used in APIs and storage. |
| Label | Caption shown on the form. Use the translation icon to localize it. |
| Data Type | Control type — e.g. Text, Number, Date, Textarea, Dropdowns, Radios, LOV, User, Employee, Customer, Master Detail, and others. |
| Required | User must fill the field when creating/updating the record. |
| Help Text | Hint or tooltip for end users. |
Extra options appear by data type (for example Options for dropdowns/radios, LOV for list-of-values lookup, Flex List for flex-list lookup).
After create:
- Drag the field onto the layout.
- Optionally edit the definition later from the field’s edit control in the Data fields list.
- To remove it from the screen only, use × on the field in Design Mode (definition remains until you delete it).
Deleting a custom field definition (Delete on the Create/Edit Data Field dialog) removes the definition; confirm carefully — existing values may no longer be editable.
Requires customfield.update. Without it, Design Mode still works for layout, but Create Data Field is not available.
List (column) settings
Section titled “ List (column) settings”On list screens that support customization (gear / column settings in the grid toolbar), users with formlayout.update can change column order and visibility for everyone using that list setting.
Example: Leave → Records → open Column Settings.
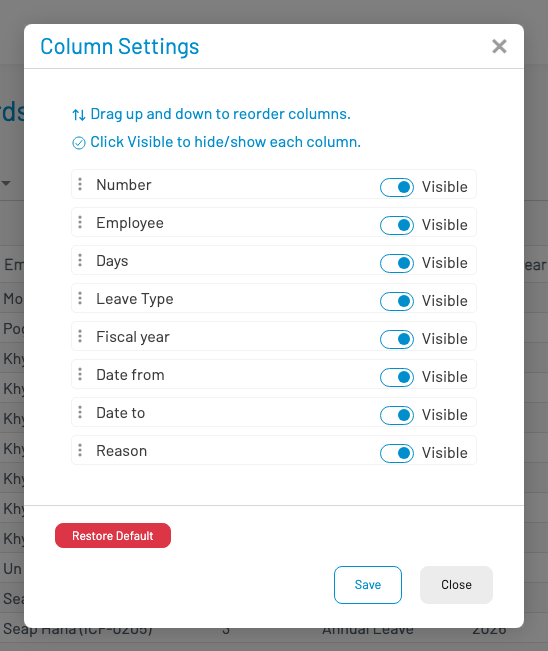
- Open the list.
- Click the column settings control (gear / settings) in the list header.
- In Column Settings:
- Drag rows up/down to reorder columns.
- Toggle Visible to show or hide a column.
- Click Save.
- Restore Default clears the saved column layout and returns to the product default.
Custom fields that are marked searchable / included in column settings can also appear in this list so you can show them as columns.